Watch a demonstration of a model of this system on YouTube!
When people here in Emporia learn that I'm into ecological gardening, they often ask me to install rain barrels for them. I'm resistent to doing this for a number of reasons, all of which have to do with limitations in how rain barrels are usually built and connected. I think I've finally cracked the problem, so here's my modest proposal for how to do it right. But first...
What's wrong with the way rain barrels are usually built?
- They're too small. Typically barrels are 55 gallons (208 L) at most, which is enough to give a typical 4'x8' (1.2 x 2.4m) garden bed 2.7 inches (7 cm) of water. That's barely enough to get that one garden bed through three weeks of drought. If you have more garden than that, or if you expect longer droughts, you will need more barrels. Potentially lots more. Most permaculturalists recommend larger tanks or cisterns, but that's often not practical when a house and garden have already been built, and it's not helpful to tell people they should tear out their garden or foundation.
- They collect debris. Unless you screen the incoming water, you will get leaves and other debris from the roof. Even if you do screen it, you'll get gravel from asphalt shingles, not to mention tar from the asphalt, and bird droppings and dust. The solution to this is a "first flush diverter," but many of the published designs are needlessly complicated with moving parts, so beginners tend to skip this precaution and direct the unfiltered water into the barrel. In hot weather, the water can stagnate and smell really foul.
- They overflow. If you look at pictures of rain barrels online, you will find lots where the downspout has been pointed directly into the barrel. This is a recipe for disaster when the barrel fills up, especially if the barrel is next to your house foundation. Adding an overflow pipe to the top of the barrel means losing part of your storage volume, and unless the overflow can handle the full incoming volume of water, the barrel will still overflow. You can find expensive gadgets for preventing this from happening. I have four of them myself, and while they work well at preventing overflow, they waste most of the water by sending only a fraction of it to the barrel, when what you want is to send 100% of the water to the barrel until it's full, then send 100% elsewhere.
- They can breed mosquitoes. Another reason to screen the incoming water is to keep adult mosquitoes from flying down to the water level and laying eggs. Unfortunately most designs have such large holes in the top that screening them is awkward, and the screens can get clogged with debris, causing premature overflow, so who can blame people for removing the screens?
- They have holes drilled in the bottom. 55-gallon drums are made of high density polyethylene (HDPE), one of the most chemically nonreactive substances science has given us. Most glue won't touch it. Epoxy won't stick. Caulk slides right off. Drilling a hole in one of these drums is just asking for a leak that you won't be able to seal, short of using an acetylene torch to weld the plastic. If you're fortunate enough to have a drum where the whole top comes off, you can reach inside and put a rubber gasket on the the inside of the spigot, but otherwise you're limited to working on the outside, desperately plugging leaks like the Little Dutch Boy. Ironically, this problem can be mitigated by dirty water (see above) which will eventually plug the leakage with dust and tar from the shingles! But every drum already has two bung holes at the top. With the proper fittings, these drums can continue to be watertight as they were designed to be for years and years of leak-free service.
- Daisy-chaining barrels is fussy and accident-prone. You can increase your storage volume by chaining barrels together. If you do this at the top, so that one barrel overflows into the next, then each barrel has to be physically lower than the previous one. If you do it at the bottom so all barrels can be the same height, the connecting hoses are under pressure even when you're not using the water, and even a slow leak can let all your water escape. It's tempting to shut off the connecting hoses to prevent this from happening, but if you forget to turn them on again before a rain, you miss out on collecting water!
- Their foundations settle. A full barrel can weigh 458 pounds (208 kg), so if you haven't built a good solid foundation, you're liable to have to rebuild it each year until it's firm. If your daisy-chaining method requires the barrels to be at the same height, you'll quickly find the lower ones store more water than the higher ones, if they don't tip over.
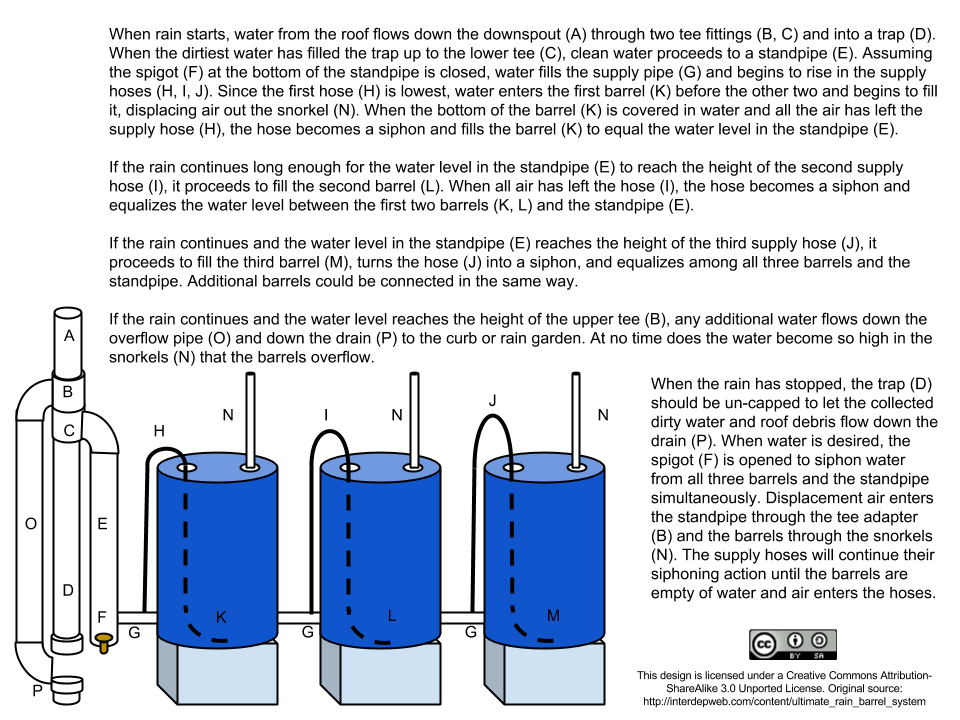
The solution to all these problems comes from understanding how a siphon works. In order to draw water from the bottom of a barrel by way of the hole in the top, we need a hose full of water with no air bubbles in it. The easy way to get the air out of the hose is to use the same hose to put the water into the barrel in the first place, and then leave it full of water until we're ready to use the water in the barrel. This means our source of water needs to be higher than the barrel(s). This design uses a standpipe for that purpose. The standpipe does not fill until after the trap (the simplest form of first-flush diverter) has filled, and when the standpipe is full, all water overflows from that point, without overfilling the barrels. The barrels do not overflow because their unused bung holes are fitted with snorkels that let air in and out above the level of the water in the standpipe. The siphons are at differing heights so that they will trip (fill with water, expelling the air bubbles) one at a time, requiring a lower flow of water than would be needed to trip them all at once.
Advantages of this design
- The barrels use their original, watertight connections, and all plumbing is left permanently connected, allowing the use of higher quality materials than temporary installations.
- Debris goes into the trap, not the standpipe, so no screening is necessary.
- The need for mosquito screening is minimal, since only the top of each snorkel need be screened. A screen could optionally be put on the top of the standpipe as well, to keep floating debris and mosquitos out at that end.
- All barrels are at roughly the same height, but the critical thing is the height of the siphons and snorkels, not the barrels themselves, so if a barrel's foundation settles while remaining upright, the difference can be addressed without rebuilding the foundation.
Without further ado, here's the design! Click to see it full size.
If this design looks needlessly complex to you, you may be interested in my follow-up article, Simpler Ultimate Rain Barrels!
- Log in to post comments


Comments (3)
suggestions from Robert E Kennedy
Ben Stallings
Hey, I just finished reading your article about the ultimate rain Barrel system and had a couple of comments/suggestions for you. In the article, you commented about not being able to get a watertight seal if you added a hole low in the barrel. You can if you use a bulkhead fitting. It's got a thick rubber washer on the inside that will form a water tight seal. You just need to tighten the fitting so that it flattens the side of the barrel at the fitting. To get them into barrels that the top doesn't come off of, add a weight to a length of string and drop it through the bung hole on the top of the barrel down to where you drilled you hole and fish the weight through the hole. Then thread the string through the inside portion of the bulkhead fitting, with the threads that come out through the hole going down the line first and drop it down the line to the hole. The string guides it right to the hole, where you can easily fish it through and then add the nut to the outside.
My other comment was about draining the trap in your design. Rather than having it where you have to remove the cap to drain it, add a small nipple to the bottom of it, one with a really small diameter hole. It will be small enough that with most applications, the amount of water lost through the nipple will be negligible compared to the inflow from the roof, so during the rain the system will still fill and work as designed. Once the rain stops, the trap will slowly empty itself down the drain without intervention. If you aren't screening the incoming water, you'll occasionally have to use a nail or straw to unclog the nipple, but that usually doesn't happen that often.
photos of Hank Osterhaut's implementation
Ben Stallings
Hank implemented this design last year (spring 2020) in Emporia, Kansas, and reports that it's still working great this year: "i just checked it and i have 6 full barrels! im implementing a similar system on the greenhouse!" He sends these photos of three of the barrels.
Can't access water in winter
Ben Stallings
One disadvantage I've found to only accessing the barrels through the top bung holes is that when the barrels freeze in winter, the liquid water below is inaccessible. So if you plan to keep using the barrels in freezing conditions, you may want to add a spigot at the bottom to access the liquid water below the ice.